Removing dead links from Google search results
I occasionally do a site search for Blogger Sentral to check whether my new entries are properly indexed by Google. How do I do a site search? Easy, you can do it too, just type this in Google search box.
site:yourblogurl
Google will search your blog and then display all your blog/site indexed pages.
Last week I noticed a two dead links showed up in the search results page. They are linked to posts I’ve already deleted.
I clicked on them, and this came out. So they are indeed dead links.
I reckoned I have to remove this search results from Google, else it will frustrate my potential readers if they were to click on the links. But how do I do that? Okay… as always I answer my own questions here…
It’s like this:
1. Go to Google webpage removal request tool page and sign in to your Google account.
2. Click New Removal Request button.
3. Enter the URL of the page you want to remove. To prevent mistakes I do this by copying the link from Google search result itself, and paste it into the text box.
4. Tick the“The page returns a 404/410…” checkbox and click Submit Request button.
5. The URL you requested will be listed, with “Pending” status.
6. Google will take a few days to do the work for you. After removal the status will change to “Removed”.
7. was indeed removed from Google SERP.
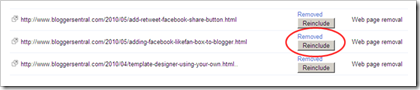
8. You can get back the removed url by clicking “Reinclude” button.
9. Enjoy!
Pages
Saturday, September 18, 2010
10 tools to help you develop a better blog
To blog (or to do anything else for that matter) requires tools. Today I want to list some of the tools I use in helping me develop and maintain my blog. In no particular order, here it is:
Windows Live Writer. In addition to doing what other blog editors are doing, WLW let you preview your post (I mean really show you what it would look like when posted). Its image handling ability is above average in my opinion.
Photobucket. Well, it’s a bucket full of photos. Upload images, and use them in your blog. Good free stuff.
Firebug. Firebug is an add-on for Firefox. Point the mouse to any place in a webpage, Firebug will show you the codes that go with it. You can then change the code and instantly view the effect. A great debugging and learning tool.
Web Developer. Another Firefox add-on for web development. Web Developer will overwhelm you with functions. But for now I only use it for CSS editing. You can save the changes midway, comeback, reload the changes and continue.
w3schools. This is a website, but I consider it a tool too. This is the place you go if you want to learn about HTML and CSS (or any else related to web building). The aspect that I like most here is the ability to try out the code and view the effect instantly, in the same screen.
Code syntax highlighter. Web browsers are smart, you put in codes, they translate them into pictures and display on the monitor. But, but…what if all you want is to just display the codes. Then this is the tool you use. After much searching, I found the one I like. I will write a post on this soon.
Color Picker. Found a color you like, but don’t know the hex code for it? Then use this tool. Just click the color and it copies the hex code for you. You can then paste the hex code wherever you want.
CoLT. CoLT (COpy Link Text) lets you copy a link easily. It has 3 options -copy only the anchor text, only the link or copy both text and link (in HTML link or text form).
Statcounter. A web tracker, providing real-time statistics of your blog’s traffic. I prefer Statcounter to other web trackers because it handles multiple sites with just one account.
Google Search. Hmm.…Google, and thou shall find. Enough said.
What tools do you use? Feel free to share them in comments below.
How to show code in blog post
Web browsers are smart, you give them codes, they render them into images and display on the monitor. That’s good, but what if all you want to do is just to display the codes in your post, as it is. There are quite a few solutions available on the internet, but what I am going to show you is think among the better ones.
(Note: Before we proceed, if you plan to use this only occasionally, then just use <code>…</code> tags. It’s built-in, so you don’t have to add anything, but the code won’t look as good).
It is called SyntaxHighlighter by Alex Gorbatchev. It uses JavaScript library, does the highlighting using CSS, and supports (the highlighting of) many programming languages. I am going to explain how do you go about using this tool:
1. Preparing your template
Download the scripts. You can download all the required script files here.
Extract the files and upload them to your server. Upload only the needed files, you’ll find out the one you need as you read along. If you don’t have a file host, don’t despair, there is a free hosted version.
Link the files to your template by going to Design > Edit HTML and inserting the code below right before the </head> tag:
(For the purpose of this demonstration it will be assumed that scripts/*.* was extracted and put inside /scripts folder and styles/*.* are put inside /styles folder.)
To copy code, click <> icon on the right
view source
print
?1 <link type="text/css" rel="stylesheet" href="/styles/shCore.css" />
2 <link type="text/css" rel="stylesheet" href="/styles/shThemeDefault.css" />
3 <script type="text/javascript" src="/scripts/shCore.js"></script>
4 <script type="text/javascript" src="/scripts/shBrushJScript.js"></script>
5 <script type="text/javascript" src="/scripts/shBrushBash.js"></script>
6 <script type="text/javascript" src="/scripts/shBrushCpp.js"></script>
7 <script type="text/javascript">
8 SyntaxHighlighter.all();
9 </script>
To copy code, click <> icon on the right
view source
print
?1 <link type="text/css" rel="stylesheet" href="/styles/shCore.css" />
2 <link type="text/css" rel="stylesheet" href="/styles/shThemeDefault.css" />
3 <script type="text/javascript" src="/scripts/shCore.js"></script>
4 <script type="text/javascript" src="/scripts/shBrushJScript.js"></script>
5 <script type="text/javascript" src="/scripts/shBrushBash.js"></script>
6 <script type="text/javascript" src="/scripts/shBrushCpp.js"></script>
7 <script type="text/javascript">
8 SyntaxHighlighter.all();
9 </script>
You can apply a theme (as in code line 2) other than the default. Upload them and add the link into the code. For additional syntax support, add more brushes (as in code line 4 to 6). But remember more links equals slower page loading.
2. Adding code block (that you want to show) into your post
SyntaxHighlighter looks for <pre></pre> (pre-formatted text) tags which have specially formatted class attribute. The only required parameter is brush (see configuration) which should be set to one of the brush aliases that you have loaded previously.
First you need to HTML-escape your code snippet to convert special characters to such as < and > to their escape form < and > respectively. You can do this manually or use an online escape tool.
Go to post editor and switch to Edit HTML mode.
Place the escaped code inside <pre> tags, with class attribute included, like so:
To copy code, click <> icon on the right
view source
print
?1 <pre class="brush: js">
2 ENTER YOUR ESCAPED CODE SNIPPET HERE
3 </pre>
If you use Window Live Writer to edit you posts, you can use this Syntax Highlighter plug-in by Arnold Matusz. With this plug-in, you just copy and paste the code into the plug-in screen. You don’t have to escape the code or manually enter it, all you have to do is paste the code inside the plugin window.
3. Integrating Syntax Highlighter with Blogger
If you are hosting on blogger.com, you must add this line:
To copy code, click <> icon on the right
view source
print
?1 SyntaxHighlighter.config.bloggerMode = true
See the code I use in Blogger Sentral below.
One more thing, go to Dashboard > Settings > Formatting and set “Convert Line Breaks” to No.
4. Using free hosted version
I use this option, no need to download or upload anything. See my code below:
To copy code, click <> icon on the right
view source
print
?01 <!-- mula alexgorbachev.com syntax highlighter -->
02 <link href='http://alexgorbatchev.com/pub/sh/current/styles/shCore.css' rel='stylesheet' type='text/css'/>
03 <link href='http://alexgorbatchev.com/pub/sh/current/styles/shThemeDefault.css' rel='stylesheet' type='text/css'/>
04 <script src='http://alexgorbatchev.com/pub/sh/current/scripts/shCore.js' type='text/javascript'/>
05 <script src='http://alexgorbatchev.com/pub/sh/current/scripts/shBrushXml.js' type='text/javascript'/>
06 <script src='http://alexgorbatchev.com/pub/sh/current/scripts/shBrushCss.js' type='text/javascript'/>
07 <script src='http://alexgorbatchev.com/pub/sh/current/scripts/shBrushJScript.js' type='text/javascript'/>
08 <script type='text/javascript'>
09 SyntaxHighlighter.config.bloggerMode = true;
10 SyntaxHighlighter.all();
11 </script>
12 <!-- tamat alexgorbachev.com syntax highlighter –>
Just copy the codes above and add extra scripts you need. This is the location of hosted script files.
Enjoy!
Before you leave:
Do you find this article useful? Share it via Retweet , Share and Stumble buttons.
Any suggestion, question or comment? Please post it in the comments below.
ps. SyntaxHighlighter is a donationware, if you do use it, please consider donating to the owner. Thanks
Web browsers are smart, you give them codes, they render them into images and display on the monitor. That’s good, but what if all you want to do is just to display the codes in your post, as it is. There are quite a few solutions available on the internet, but what I am going to show you is think among the better ones.
(Note: Before we proceed, if you plan to use this only occasionally, then just use <code>…</code> tags. It’s built-in, so you don’t have to add anything, but the code won’t look as good).
It is called SyntaxHighlighter by Alex Gorbatchev. It uses JavaScript library, does the highlighting using CSS, and supports (the highlighting of) many programming languages. I am going to explain how do you go about using this tool:
1. Preparing your template
Download the scripts. You can download all the required script files here.
Extract the files and upload them to your server. Upload only the needed files, you’ll find out the one you need as you read along. If you don’t have a file host, don’t despair, there is a free hosted version.
Link the files to your template by going to Design > Edit HTML and inserting the code below right before the </head> tag:
(For the purpose of this demonstration it will be assumed that scripts/*.* was extracted and put inside /scripts folder and styles/*.* are put inside /styles folder.)
To copy code, click <> icon on the right
view source
?1 <link type="text/css" rel="stylesheet" href="/styles/shCore.css" />
2 <link type="text/css" rel="stylesheet" href="/styles/shThemeDefault.css" />
3 <script type="text/javascript" src="/scripts/shCore.js"></script>
4 <script type="text/javascript" src="/scripts/shBrushJScript.js"></script>
5 <script type="text/javascript" src="/scripts/shBrushBash.js"></script>
6 <script type="text/javascript" src="/scripts/shBrushCpp.js"></script>
7 <script type="text/javascript">
8 SyntaxHighlighter.all();
9 </script>
To copy code, click <> icon on the right
view source
?1 <link type="text/css" rel="stylesheet" href="/styles/shCore.css" />
2 <link type="text/css" rel="stylesheet" href="/styles/shThemeDefault.css" />
3 <script type="text/javascript" src="/scripts/shCore.js"></script>
4 <script type="text/javascript" src="/scripts/shBrushJScript.js"></script>
5 <script type="text/javascript" src="/scripts/shBrushBash.js"></script>
6 <script type="text/javascript" src="/scripts/shBrushCpp.js"></script>
7 <script type="text/javascript">
8 SyntaxHighlighter.all();
9 </script>
You can apply a theme (as in code line 2) other than the default. Upload them and add the link into the code. For additional syntax support, add more brushes (as in code line 4 to 6). But remember more links equals slower page loading.
2. Adding code block (that you want to show) into your post
SyntaxHighlighter looks for <pre></pre> (pre-formatted text) tags which have specially formatted class attribute. The only required parameter is brush (see configuration) which should be set to one of the brush aliases that you have loaded previously.
First you need to HTML-escape your code snippet to convert special characters to such as < and > to their escape form < and > respectively. You can do this manually or use an online escape tool.
Go to post editor and switch to Edit HTML mode.
Place the escaped code inside <pre> tags, with class attribute included, like so:
To copy code, click <> icon on the right
view source
?1 <pre class="brush: js">
2 ENTER YOUR ESCAPED CODE SNIPPET HERE
3 </pre>
If you use Window Live Writer to edit you posts, you can use this Syntax Highlighter plug-in by Arnold Matusz. With this plug-in, you just copy and paste the code into the plug-in screen. You don’t have to escape the code or manually enter it, all you have to do is paste the code inside the plugin window.
3. Integrating Syntax Highlighter with Blogger
If you are hosting on blogger.com, you must add this line:
To copy code, click <> icon on the right
view source
?1 SyntaxHighlighter.config.bloggerMode = true
See the code I use in Blogger Sentral below.
One more thing, go to Dashboard > Settings > Formatting and set “Convert Line Breaks” to No.
4. Using free hosted version
I use this option, no need to download or upload anything. See my code below:
To copy code, click <> icon on the right
view source
?01 <!-- mula alexgorbachev.com syntax highlighter -->
02 <link href='http://alexgorbatchev.com/pub/sh/current/styles/shCore.css' rel='stylesheet' type='text/css'/>
03 <link href='http://alexgorbatchev.com/pub/sh/current/styles/shThemeDefault.css' rel='stylesheet' type='text/css'/>
04 <script src='http://alexgorbatchev.com/pub/sh/current/scripts/shCore.js' type='text/javascript'/>
05 <script src='http://alexgorbatchev.com/pub/sh/current/scripts/shBrushXml.js' type='text/javascript'/>
06 <script src='http://alexgorbatchev.com/pub/sh/current/scripts/shBrushCss.js' type='text/javascript'/>
07 <script src='http://alexgorbatchev.com/pub/sh/current/scripts/shBrushJScript.js' type='text/javascript'/>
08 <script type='text/javascript'>
09 SyntaxHighlighter.config.bloggerMode = true;
10 SyntaxHighlighter.all();
11 </script>
12 <!-- tamat alexgorbachev.com syntax highlighter –>
Just copy the codes above and add extra scripts you need. This is the location of hosted script files.
Enjoy!
Before you leave:
Do you find this article useful? Share it via Retweet , Share and Stumble buttons.
Any suggestion, question or comment? Please post it in the comments below.
ps. SyntaxHighlighter is a donationware, if you do use it, please consider donating to the owner. Thanks
Submitting Blogger sitemap to Google
What is a site map?
Sitemap is an XML file that lists URLs for a site along with additional information about each URL: when it was last updated, how often it changes, and how important it is in relation to other URLs in the site.
Why do you need to submit a sitemap?
Sitemaps allow you to inform search engines about pages on your blogs that are available for crawling. This allows search engines to crawl the blog more intelligently.
Google says:
Google uses your Sitemap to learn about the structure of your site and to increase our coverage of your webpages. Submit a Sitemap to tell Google about pages on your site we might not otherwise discover.
So, if some of your posts don’t show up in Google search, submitting a sitemap might be the answer.
How do you make a sitemap?
You don’t have to, it’s already there.
In Blogger, your blog sitemap is your post feed1 http://yourblog.blogspot.com/atom.xml
or 1 http://yourblog.blogspot.com/feeds/posts/default
1 http://yourblog.blogspot.com/feeds/posts/default
How do you submit a sitemap?
You go to Google Webmasters Tools homepage and sign in to your Google account.
Click on your chosen blog. You’ll be transferred to the Dashboard.
Click Submit a Sitemap link on the bottom right of the Dashboard. You’ll be transferred to Sitemaps page.
Click [+] Submit a Sitemap button.
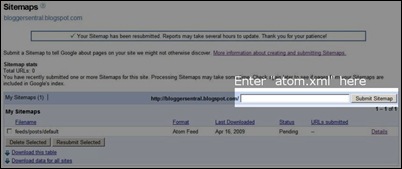
An input box appears, enter “atom.xml”, append the parameters if necessary and then click Submit Sitemap button.
Related url parameters (to be appended to your feed url)
max-results -if you have more than 25 posts. This is because the default feed only gives out 25 of your latest posts. Example: use max-results=100 if you want to include up to 100 posts.
redirect=false -if you redirect your feed (usually so if you use Feedburner to handle your blog’s feed).
How to append url parameter? After atom.xml, append a question mark the add the parameters. Separate each parameter with an ampersand. Example: atom.xml?max-results=100&redirect=false.
Google will take a few hours to process your submission i.e. to change the status from Pending to OK.
What is a site map?
Sitemap is an XML file that lists URLs for a site along with additional information about each URL: when it was last updated, how often it changes, and how important it is in relation to other URLs in the site.
Why do you need to submit a sitemap?
Sitemaps allow you to inform search engines about pages on your blogs that are available for crawling. This allows search engines to crawl the blog more intelligently.
Google says:
Google uses your Sitemap to learn about the structure of your site and to increase our coverage of your webpages. Submit a Sitemap to tell Google about pages on your site we might not otherwise discover.
So, if some of your posts don’t show up in Google search, submitting a sitemap might be the answer.
How do you make a sitemap?
You don’t have to, it’s already there.
In Blogger, your blog sitemap is your post feed1 http://yourblog.blogspot.com/atom.xml
or 1 http://yourblog.blogspot.com/feeds/posts/default
1 http://yourblog.blogspot.com/feeds/posts/default
How do you submit a sitemap?
You go to Google Webmasters Tools homepage and sign in to your Google account.
Click on your chosen blog. You’ll be transferred to the Dashboard.
Click Submit a Sitemap link on the bottom right of the Dashboard. You’ll be transferred to Sitemaps page.
Click [+] Submit a Sitemap button.
An input box appears, enter “atom.xml”, append the parameters if necessary and then click Submit Sitemap button.
Related url parameters (to be appended to your feed url)
max-results -if you have more than 25 posts. This is because the default feed only gives out 25 of your latest posts. Example: use max-results=100 if you want to include up to 100 posts.
redirect=false -if you redirect your feed (usually so if you use Feedburner to handle your blog’s feed).
How to append url parameter? After atom.xml, append a question mark the add the parameters. Separate each parameter with an ampersand. Example: atom.xml?max-results=100&redirect=false.
Google will take a few hours to process your submission i.e. to change the status from Pending to OK.
Click Older Posts To Next Pages