Pages

Friday, December 17, 2010

How to show Static Pages on your current Menu Bar

How to show Static Pages on your current Menu Bar

This tutorial will help You to show Blogger Static Pages on your previows installed Menu Bar, which most of my templates has one. Check also and images, will help you to make this tutorial easy as it is.

Let Start

1. Go to Blogger Dashboard --> click New Post --> click Edit Pages --> create New Page [ie: About Me] --> Publish Page

2. Now you will see How would you like the Pages Gadget to appear? --> click No gadget --> Save and Publish [Check This IMAGE]

3. Now click Edit Page and right click on View --> Copy Link Address [Check This IMAGE]

4. Go back at your Dashboard and click Design --> Edit HTML --> Search [CTRL+F] --> About

5. You will see all code for top Menu Links [ie: About, Contact] [Check This IMAGE]

6. Now if you created About Me page, replace # with your link, that you copied [see step 3] [Check This IMAGE]

7. Preview / Save That's it


How to Create Menu Pages on Blogger (ie About, Contact Us, etc)


How to Create Menu Pages on Blogger (ie About, Contact Us, etc)

Its really simple, but I got many comments asking for this so I'm writing it.

1. Go to Blogger Dashboard
2. Click edit Post
3. Click edit Pages
4. New Page


How to install a Blogger Template


How to install a Blogger Template


1. Click in Download button and save file in PC [hard drive].

2. File that you have downloaded is .ZIP file so need to be extracted. Extract / Unzip it.

3. Log in Blogger dashboard

4. Click Design link in dashboard panel.

5. Now click in Edit HTML link in tab bar.

6. Click Browse button and look for folder that is created after extracted file that you have downloaded.

7. Folder has a XML file and TXT file or Internet shortcut, you select only XML file.

8. Click Upload button.

9. Confirm and Save.

Wednesday, December 1, 2010

Earn Money at Home 100% Test No Need Experience


  Online Earning 100% Test No Need Experience

I am Tested This ....
and it is working properly NO problem ...
you need to Register for work.


You need to do simple work just like Facebook like, Article, Comment, account create, ads publish etc

Sign Up Or Register Click Here 


And Make Money Booker Account for Money Transaction ALL FREE you also take money from  pay pal and Alertpay


 For Home Online Work:
Microworkers-e Sign Up 

For Money Transaction: 
Moneybooker (Sign Up)


 Alertpay (Sign up) 

Thursday, November 4, 2010

Numbered Page Navigation For Blogspot


Numbered Page Navigation For Blogspot
Page Navigation is an awesome feature. You might have seen numbered page navigation on many wordpress blogs But Number navigation is really essential feature for every blog site. You can make easily page number navigation from now.

2.Don’t click the checkbox which says ‘Expand Widget Templates’


3.Now find

]]></b:skin>

and replace it with


.showpageArea a {
text-decoration:underline;
}
.showpageNum a {
text-decoration:none;
border: 1px solid #cccccc;
margin:0 3px;
padding:3px;
}
.showpageNum a:hover {
border: 1px solid #cccccc;
background-color:#cccccc;
}
.showpagePoint {
color:#333;
text-decoration:none;
border: 1px solid #cccccc;
background: #cccccc;
margin:0 3px;
padding:3px;
}
.showpageOf {
text-decoration:none;
padding:3px;
margin: 0 3px 0 0;
}
.showpage a {
text-decoration:none;
border: 1px solid #cccccc;
padding:3px;
}
.showpage a:hover {
text-decoration:none;
}
.showpageNum a:link,.showpage a:link {
text-decoration:none;
color:#333333;
}
]]></b:skin>


Next is the JavaScript part. Find

 </body>

and replace it with


<!--Page Navigation Starts-->
<b:if cond='data:blog.pageType != &quot;item&quot;'>

<b:if cond='data:blog.pageType != &quot;static_page&quot;'>
<script type='text/javascript'>
var pageCount=5;
var displayPageNum=5;
var upPageWord =&#39;Previous&#39;;
var downPageWord =&#39;Next&#39;;
</script>
<script src='http://blogergadgets.googlecode.com/files/blogger-page-navi.v1.js' type='text/javascript'/>
</b:if>
</b:if>
<!--Page Navigation Ends -->
</body>


As you can see,there are some customizable parameters in this code
var pageCount=5;
This code determines the number of posts that would be displayed per page.
var displayPageNum=5;
This code determines the number of additional page navigation numbers that will be displayed on the page.
var upPageWord =&#39;Previous&#39;;
var downPageWord =&#39;Next&#39;;
These two lines determine the text that would be shown for the previous page and next page respectively.


Clean All Unnecessary Files Without Software


Clean All Unnecessary Files

Temp
Temporary Internet Files
History
Recent

Technique:
First You Open NotePad  Copy Under Code and past on Notepad and Save it CleanFile.bat after save
 you click CleanFile File. 

***************************

@echo off


if %username% == Administrator.WINDOWS goto admin

REM ** Delete User Files **

rmdir /S/Q "%systemdrive%\Documents and Settings\%username%\Recent"
rmdir /S/Q "%systemdrive%\Documents and Settings\%username%\Local Settings\Temp"
rmdir /S/Q "%systemdrive%\Documents and Settings\%username%\Local Settings\History\History.ie5"
rmdir /S/Q "%systemdrive%\Documents and Settings\%username%\Local Settings\Temporary Internet Files\content.ie5"

goto end

:admin
REM ** Do some extra stuff here **
REM ** What ever you want..... **

ECHO You are a Administrator

rmdir /S/Q "%systemdrive%\Documents and Settings\%username%\Recent"
rmdir /S/Q "%systemdrive%\Documents and Settings\%username%\Local Settings\Temp"
rmdir /S/Q "%systemdrive%\Documents and Settings\%username%\Local Settings\History\History.ie5"
rmdir /S/Q "%systemdrive%\Documents and Settings\%username%\Local Settings\Temporary Internet Files\content.ie5"

REM ** Do more stuff here **
REM ** Blah, blah, blah......**

:end
exit

Monday, October 25, 2010

How to Prevent Search Engines from Indexing Specific Pages

How to Prevent Search Engines from Indexing Specific Pages

You can prevent the indexing of a particular page in the following ways:

Applying the NOINDEX metatag:


Place one of the following metatags in the <HEAD> section of your page:
<META NAME="ROBOTS" CONTENT="NOINDEX">
   or
Yahoo! Slurp retrieves the document, but it does not index the document text.

Applying the NOINDEX Directive:


Configure your web server to place the following directive in the HTTP header used to serve the page:
    X-Robots-Tag:NOINDEX
    
    
Note: Although the document content is not indexed, the URL might remain in the search engine database as a reference link from other public web pages.


How to Reduce the Number of Requests the Search Crawler Makes on Your Site

How to Reduce the Number of Requests the Search Crawler Makes on Your Site

If you occasionally get high traffic from search crawlers, you can specify a crawl delay parameter in the robots.txt file to specify how often, in seconds, search crawlers can access your website. To do this, add the following syntax to your robots.txt file:
User-agent: *
Crawl-delay: 10
Individual crawler sections override the settings that are specified in * sections. If you've specified Disallow settings for all crawlers, you must add the Disallow settings to the search crawler section you create in the robots.txt file. For example, your robots.txt file might have the following:
User-agent: *
Disallow: /private/
If you add a specific search crawler section, you must add any Disallow settings to that section.
For example:
User-agent: *
Crawl-delay: 10
Disallow: /private/

How to Change a Page Title or Description in Yahoo! Search Results

How to Change a Page Title or Description in Yahoo! Search Results

Yahoo! uses a variety of sources for information about your webpages. This allows us to dynamically construct meaningful abstracts, descriptions and titles that will assist users in understanding your page.
These sources include, but are not limited to: text on the page, the page's Meta description, and editorial descriptions from the Yahoo! Directory and third parties. The abstract can change depending on the search terms entered. Changing the content and the metadata on your page can influence the abstract.
ODP Titles and Abstracts
To remove ODP titles and abstracts as candidate title and abstract for one or more of your URLs, use one of the following Meta tags on your pages:
<META NAME="ROBOTS" CONTENT="NOODP">
   or
<META NAME="Slurp" CONTENT="NOODP">
When we find any of these tags in the Meta data of your web document, Yahoo! Search will not take ODP titles or abstracts into consideration when presenting the title and description for that URL in search results.
Yahoo! Directory Titles and Abstracts
To indicate that Yahoo! Directory titles and abstracts not be considered in web search results, use the "NOYDIR" Meta tag.
The webcrawler recognizes the following Meta tags on your pages:
<META NAME="ROBOTS" CONTENT="NOYDIR">
   or
<META NAME="Slurp" CONTENT="NOYDIR">
When we find any of these tags in the Meta data of your web document, Yahoo! Search will not take Yahoo! Directory titles or abstracts into consideration when presenting the title and description for that URL in search results.
Note: A webpage URL may show in search results without an abstract. A URL may be included in the search results as a "thin" document with no text content. Links and reference text from other public web pages may provide identifiable information about a URL and may be indexed as part of web search coverage.

Saturday, October 16, 2010

Webmaster Tools

Webmaster Tools

All three major search engines provide webmaster tools that give you detailed information and statistics about how they see and crawl your website. In order to access most of the features, you will have to verify your sites. Here’s how you do it with each of the search engines:

1 Google Webmaster Tools
 Log in to https://www.google.com/webmasters/tools/ with your Google account.

2 Enter your blog URL and click Add Site.
3 You will be presented with several verification methods. Choose Meta Tag.

4 Copy the meta tag, which looks something like
 <meta name='google-site-verification' content='dBw5CvburAxi537Rp9qi5uG2174Vb6JwHwIRwPSLIK8'>

5 Leave the verification page open and go to your blog dashboard.
6 Open the Tools Page and paste the code in the appropriate field.
7 Click on Save Changes.
8 Go back to the verification page and click Verify.


Yahoo Site Explorer
 
1 Log in to https://siteexplorer.search.yahoo.com/ with your Yahoo account.
2 Enter your blog URL and click Add My Site.

3 You will be presented with several authentication methods. Choose By adding a META tag to my home page..

4 Copy the meta tag, which looks something like
<meta name='y_key' content='3236dee82aabe064'>

5 Leave the verification page open and go to your blog dashboard.
6 Open the Tools Page and paste the code in the appropriate field.
7 Click on Save Changes.
8 Go back to the verification page and click Ready to Authenticate.

Note: It may take up to 24 hours for your site to be authenticated.

Bing Webmaster Center
 
1 Log in to http://www.bing.com/webmaster with your Live! account.
2 Click Add a Site.

3 Enter your blog URL and click Submit.

4 Copy the meta tag from the text area at the bottom. It looks something like
<meta name='msvalidate.01' content='12C1203B5086AECE94EB3A3D9830B2E'>

5 Leave the verification page open and go to your blog dashboard.
6 Open the Tools Page and paste the code in the appropriate field.
7 Click on Save Changes.
8 Go back to the verification page and click Return to the Site list.

Friday, October 15, 2010

ChocoTheme


ChocoTheme
 
Stylish WordPress theme with two columns, right-sidebar. 3 color schemes availible. Theme options panel for background and navigation configuration.

Download:

WordPress Version 3.0.1


WordPress Version 3.0.1

The latest stable release of WordPress (Version 3.0.1) is available in two formats from the links to your right. If you have no idea what to do with this download, we recommend signing up with one of our web hosting partners that offers a one click install of WordPress or getting a free account on WordPress.com.
What’s Next?

With our famous 5-minute installation, setting up WordPress for the first time is simple. We’ve created a handy guide to see you through the installation process. If you're upgrading your existing installation, we've got a guide for that, too. And should you run into any trouble along the way, our support forums are a great resource, where seasoned WordPress experts volunteer their time to help you get the most out of your blog.

Download:

P2


P2
A group blog theme for short update messages, inspired by Twitter. Featuring: Hassle-free posting from the front page. Perfect for group blogging, or as a liveblog theme. Dynamic page updates. Threaded comment display on the front page. In-line editing for posts and comments. Live tag suggestion based on previously used tags. A show/hide feature for comments, to keep things tidy. Real-time notifications when a new comment or update is posted. Super-handy keyboard shortcuts. Helvetica Neue for you modern font lovers.

Download:

Saturday, September 18, 2010

Removing dead links from Google search results

Removing dead links from Google search results

I occasionally do a site search for Blogger Sentral to check whether my new entries are properly indexed by Google. How do I do a site search? Easy, you can do it too, just type this in Google search box.
site:yourblogurl

Google will search your blog and then display all your blog/site indexed pages.

Last week I noticed a two dead links showed up in the search results page. They are linked to posts I’ve already deleted.

I clicked on them, and this came out. So they are indeed dead links.


 I reckoned I have to remove this search results from Google, else it will frustrate my potential readers if they were to click on the links. But how do I do that? Okay… as always I answer my own questions here…

It’s like this:

1. Go to Google webpage removal request tool page and sign in to your Google account.

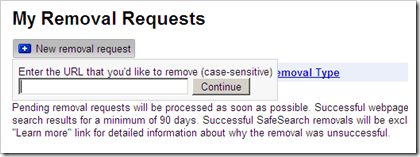
2. Click New Removal Request button.


 3. Enter the URL of the page you want to remove. To prevent mistakes I do this by copying the link from Google search result itself, and paste it into the text box.

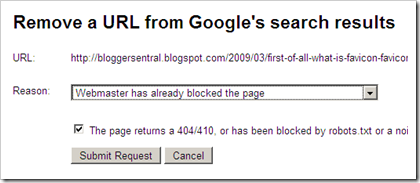
4. Tick the“The page returns a 404/410…” checkbox and click Submit Request button.

5. The URL you requested will be listed, with “Pending” status.


6. Google will take a few days to do the work for you. After removal the status will change to “Removed”.


 7. was indeed removed from Google SERP.

8. You can get back the removed url by clicking “Reinclude” button.

9. Enjoy!

10 tools to help you develop a better blog


10 tools to help you develop a better blog

To blog (or to do anything else for that matter) requires tools. Today I want to list some of the tools I use in helping me develop and maintain my blog. In no particular order, here it is:

Windows Live Writer. In addition to doing what other blog editors are doing, WLW let you preview your post (I mean really show you what it would look like when posted). Its image handling ability is above average in my opinion.
Photobucket. Well, it’s a bucket full of photos. Upload images, and use them in your blog. Good free stuff.

Firebug. Firebug is an add-on for Firefox. Point the mouse to any place in a webpage, Firebug will show you the codes that go with it. You can then change the code and instantly view the effect. A great debugging and learning tool.

Web Developer. Another Firefox add-on for web development. Web Developer will overwhelm you with functions. But for now I only use it for CSS editing. You can save the changes midway, comeback, reload the changes and continue.

w3schools. This is a website, but I consider it a tool too. This is the place you go if you want to learn about HTML and CSS (or any else related to web building). The aspect that I like most here is the ability to try out the code and view the effect instantly, in the same screen.

Code syntax highlighter. Web browsers are smart, you put in codes, they translate them into pictures and display on the monitor. But, but…what if all you want is to just display the codes. Then this is the tool you use. After much searching, I found the one I like. I will write a post on this soon.
 
Color Picker. Found a color you like, but don’t know the hex code for it? Then use this tool. Just click the color and it copies the hex code for you. You can then paste the hex code wherever you want.
 
CoLT. CoLT (COpy Link Text) lets you copy a link easily. It has 3 options -copy only the anchor text, only the link or copy both text and link (in HTML link or text form).
 
Statcounter. A web tracker, providing real-time statistics of your blog’s traffic. I prefer Statcounter to other web trackers because it handles multiple sites with just one account.
 
Google Search. Hmm.…Google, and thou shall find. Enough said.

What tools do you use? Feel free to share them in comments below.

How to show code in blog post

How to show code in blog post


Web browsers are smart, you give them codes, they render them into images and display on the monitor. That’s good, but what if all you want to do is just to display the codes in your post, as it is. There are quite a few solutions available on the internet, but what I am going to show you is think among the better ones.

(Note: Before we proceed, if you plan to use this only occasionally, then just use <code>…</code> tags. It’s built-in, so you don’t have to add anything, but the code won’t look as good).

It is called SyntaxHighlighter by Alex Gorbatchev. It uses JavaScript library, does the highlighting using CSS, and supports (the highlighting of) many programming languages. I am going to explain how do you go about using this tool:


1. Preparing your template
Download the scripts. You can download all the required script files here.
Extract the files and upload them to your server. Upload only the needed files, you’ll find out the one you need as you read along. If you don’t have a file host, don’t despair, there is a free hosted version.
Link the files to your template by going to Design > Edit HTML and inserting the code below right before the </head> tag:
(For the purpose of this demonstration it will be assumed that scripts/*.* was extracted and put inside /scripts folder and styles/*.* are put inside /styles folder.)

To copy code, click <> icon on the right

view source
print
?1 <link type="text/css" rel="stylesheet" href="/styles/shCore.css" />
2 <link type="text/css" rel="stylesheet" href="/styles/shThemeDefault.css" />
3 <script type="text/javascript" src="/scripts/shCore.js"></script>
4 <script type="text/javascript" src="/scripts/shBrushJScript.js"></script>
5 <script type="text/javascript" src="/scripts/shBrushBash.js"></script>
6 <script type="text/javascript" src="/scripts/shBrushCpp.js"></script>
7 <script type="text/javascript">
8 SyntaxHighlighter.all();
9 </script>

To copy code, click <> icon on the right
view source
print
?1 <link type="text/css" rel="stylesheet" href="/styles/shCore.css" />
2 <link type="text/css" rel="stylesheet" href="/styles/shThemeDefault.css" />
3 <script type="text/javascript" src="/scripts/shCore.js"></script>
4 <script type="text/javascript" src="/scripts/shBrushJScript.js"></script>
5 <script type="text/javascript" src="/scripts/shBrushBash.js"></script>
6 <script type="text/javascript" src="/scripts/shBrushCpp.js"></script>
7 <script type="text/javascript">
8 SyntaxHighlighter.all();
9 </script>

You can apply a theme (as in code line 2) other than the default. Upload them and add the link into the code. For additional syntax support, add more brushes (as in code line 4 to 6). But remember more links equals slower page loading.


2. Adding code block (that you want to show) into your post

SyntaxHighlighter looks for <pre></pre> (pre-formatted text) tags which have specially formatted class attribute. The only required parameter is brush (see configuration) which should be set to one of the brush aliases that you have loaded previously.
First you need to HTML-escape your code snippet to convert special characters to such as < and > to their escape form &lt; and &gt; respectively. You can do this manually or use an online escape tool.
Go to post editor and switch to Edit HTML mode.
Place the escaped code inside <pre> tags, with class attribute included, like so:
To copy code, click <> icon on the right
view source
print
?1 <pre class="brush: js">
2 ENTER YOUR ESCAPED CODE SNIPPET HERE
3 </pre>


If you use Window Live Writer to edit you posts, you can use this Syntax Highlighter plug-in by Arnold Matusz. With this plug-in, you just copy and paste the code into the plug-in screen. You don’t have to escape the code or manually enter it, all you have to do is paste the code inside the plugin window.


3. Integrating Syntax Highlighter with Blogger

If you are hosting on blogger.com, you must add this line:
To copy code, click <> icon on the right
view source
print
?1 SyntaxHighlighter.config.bloggerMode = true


See the code I use in Blogger Sentral below.

One more thing, go to Dashboard > Settings > Formatting and set “Convert Line Breaks” to No.


4. Using free hosted version

I use this option, no need to download or upload anything. See my code below:
To copy code, click <> icon on the right
view source
print
?01 <!-- mula alexgorbachev.com syntax highlighter -->
02 <link href='http://alexgorbatchev.com/pub/sh/current/styles/shCore.css' rel='stylesheet' type='text/css'/>
03 <link href='http://alexgorbatchev.com/pub/sh/current/styles/shThemeDefault.css' rel='stylesheet' type='text/css'/>
04 <script src='http://alexgorbatchev.com/pub/sh/current/scripts/shCore.js' type='text/javascript'/>
05 <script src='http://alexgorbatchev.com/pub/sh/current/scripts/shBrushXml.js' type='text/javascript'/>
06 <script src='http://alexgorbatchev.com/pub/sh/current/scripts/shBrushCss.js' type='text/javascript'/>
07 <script src='http://alexgorbatchev.com/pub/sh/current/scripts/shBrushJScript.js' type='text/javascript'/>
08 <script type='text/javascript'>
09 SyntaxHighlighter.config.bloggerMode = true;
10 SyntaxHighlighter.all();
11 </script>
12 <!-- tamat alexgorbachev.com syntax highlighter –>


Just copy the codes above and add extra scripts you need. This is the location of hosted script files.


Enjoy!


Before you leave:
Do you find this article useful? Share it via Retweet , Share and Stumble buttons.
Any suggestion, question or comment? Please post it in the comments below.

ps. SyntaxHighlighter is a donationware, if you do use it, please consider donating to the owner. Thanks

Submitting Blogger sitemap to Google

Submitting Blogger sitemap to Google


What is a site map?

Sitemap is an XML file that lists URLs for a site along with additional information about each URL: when it was last updated, how often it changes, and how important it is in relation to other URLs in the site.

Why do you need to submit a sitemap?

Sitemaps allow you to inform search engines about pages on your blogs that are available for crawling. This allows search engines to crawl the blog more intelligently.

Google says:

Google uses your Sitemap to learn about the structure of your site and to increase our coverage of your webpages. Submit a Sitemap to tell Google about pages on your site we might not otherwise discover.

So, if some of your posts don’t show up in Google search, submitting a sitemap might be the answer.


How do you make a sitemap?

You don’t have to, it’s already there.


In Blogger, your blog sitemap is your post feed1 http://yourblog.blogspot.com/atom.xml

or 1 http://yourblog.blogspot.com/feeds/posts/default
1 http://yourblog.blogspot.com/feeds/posts/default

How do you submit a sitemap?
You go to Google Webmasters Tools homepage and sign in to your Google account.
Click on your chosen blog. You’ll be transferred to the Dashboard.
Click Submit a Sitemap link on the bottom right of the Dashboard. You’ll be transferred to Sitemaps page.
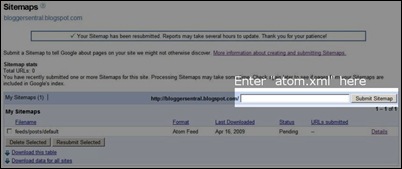
Click [+] Submit a Sitemap button.
An input box appears, enter “atom.xml”, append the parameters if necessary and then click Submit Sitemap button.


Related url parameters (to be appended to your feed url)

max-results -if you have more than 25 posts. This is because the default feed only gives out 25 of your latest posts. Example: use max-results=100 if you want to include up to 100 posts.

redirect=false -if you redirect your feed (usually so if you use Feedburner to handle your blog’s feed).

How to append url parameter? After atom.xml, append a question mark the add the parameters. Separate each parameter with an ampersand. Example: atom.xml?max-results=100&redirect=false.

Google will take a few hours to process your submission i.e. to change the status from Pending to OK.

A better way to add meta tags to Blogger

A better way to add meta tags to Blogger

One way to improve your blog SEO (Search Engine Optimization) is to add in description and keywords meta tags. They are placed inside the head section of your blog template HTML.

In description meta tag you put a description of your blog, telling what your blog is about. In keyword meta tag you put in key words relevant to your blog content.


Duplicate meta descriptions

There is a problem though, in Blogger (blogspot) the meta tags will not only reside in your homepage but also in every post pages that you create (when you post an article). Let say you posted 100 articles so far, then all 100 pages (+1 for the home page) will share the same meta tags!. This is not good, for two reasons:
Google uses your meta description (if you have one installed) as content snippet in Google SERP (search engine results page). Imagine you have same snippet for all your pages!
Google will regard them as duplicate contents (duplicate meta descriptions). Google Webmaster Tools will issue a warning if you have duplicate descriptions.


Possible solutions

There are two ways to prevent duplicate meta descriptions:
Create one set of meta tags for each page and apply them to their respective page using blog URL conditional tags. Can be done, but impractical -imagine adding 100 sets of meta and conditional tags in your template!
Limit meta description tag to homepage only. I choose this method, the lazy easy way! (When there is no meta description exists in a (post) page, Google will use an excerpt from the post content as search result content snippet).

Adding the meta tags, the better way

So I’m going to explain method no.2, here it is:
First go to Dashboard > Design > Edit HTML and find this line in your blog template HTML codes: 1 <b:include data='blog' name='all-head-content'/>

Then put the meta tags code immediately below that line. The final result should be as shown below.
To copy code, click <> icon on the right
view sourceprint?
1 <b:include data='blog' name='all-head-content'/>
2 <meta content='PUT KEYWORDS HERE SEPARATED BY COMMAS' name='keywords'/>
3 <b:if cond='data:blog.pageType == &quot;index&quot;'>
4 <meta content='PUT BLOG DESCRIPTION HERE' name='description'/>
5 </b:if>

What this code does is apply the keyword meta tag to all pages and limit description meta tag to only your homepage.
Save the template.
Checking the meta tags

Confirm whether you’ve entered the meta tags correctly, using an online meta tag checker.
Make sure you check at least two pages -home page and one of the post pages.
Compare the extracted meta information, notice the difference.

Enjoy!

Making a tag cloud, easily

Making a tag cloud, easily
Update (August 2009)

Blogger has finally added a Cloud option in their Labels gadget. To add a Label cloud, just select Cloud option (instead of List) in Configure Labels window. With this new Labels widget you can also choose to show all or only selected labels.

-------------------------------------------------------------

I just finished installing tag / label cloud on the right sidebar. Spent some time searching for codes, and finally found what I consider as the simplest one. Made some minor alteration to it, and I thought I share it with you.

Just follow the steps below:
Login to your to your Blogger account.
Back up your template.
At Dashboard go to Layout>Edit HTML.
Make sure the Expand Widget Templates check box on top right of the HTML window is unticked/unchecked.
Find the following lines in your HTML codes:
<b:section class='sidebar' id='sidebar1' preferred='yes'>
<b:widget id='HTML3' locked='false' title='' type='HTML'/>
This is your sidebar section, where widgets are located. The ids and other properties may not necessarily similar to the above. What’s important is the “<b:section class=’sidebar’…” tags must be there.
Now copy the codes below (all of them):
<b:widget id='Label88' locked='false' title='Labels' type='Label'>
<b:includable id='main'>
<!-- only display title if it's non-empty -->
<b:if cond='data:title != &quot;&quot;'>
<h2 class='title'><data:title/></h2>
</b:if>
<div class='widget-content'>
<div id='Labelcloud'>
</div>
</div>
<script language='javascript' type='text/javascript'>
function Magnifytxt() {
var max = 0;
var min = 10000;
<b:loop values='data:labels' var='label'>
if (<data:label.count/> &gt; max)
max = <data:label.count/>;
if (<data:label.count/> &lt; min)
min = <data:label.count/>;
</b:loop>
var display = &quot;&quot;;
<b:loop values='data:labels' var='label'>
var delta = <data:label.count/> - min;
var size = 80 + (delta * 100) / (max - min);
display = display + &quot;<span style='font-size:&quot; + size + &quot;%'><a expr:href='data:label.url + &quot;?max-results=100&quot;' style='text-decoration:none;'><data:label.name/></a></span> &quot;;
</b:loop>
obj = document.getElementById(&#39;Labelcloud&#39;);
obj.innerHTML = display;
}
Magnifytxt();
</script>
<b:include name='quickedit'/>
</b:includable>
</b:widget>
Insert (paste) the codes immediately below the line in step 5.
<b:section class='sidebar' id='sidebar1' preferred='yes'>
Insert the code here
<b:widget id='HTML3' locked='false' title='' type='HTML'/>
Click PREVIEW and look for your label cloud! If it’s there, then click SAVE TEMPLATE.
If you want to reposition or change the name of the label cloud go to Layout>Page Elements. Just drag it to reposition or type in the new name.
Done.


Give it a try, and feedback me afterwards okay.


Note: this label cloud code is based on the code by frivolousmotion.com.

Making a tag cloud, easily

Update (August 2009)

Blogger has finally added a Cloud option in their Labels gadget. To add a Label cloud, just select Cloud option (instead of List) in Configure Labels window. With this new Labels widget you can also choose to show all or only selected labels.

-------------------------------------------------------------

I just finished installing tag / label cloud on the right sidebar. Spent some time searching for codes, and finally found what I consider as the simplest one. Made some minor alteration to it, and I thought I share it with you.

Just follow the steps below:
Login to your to your Blogger account.
Back up your template.
At Dashboard go to Layout>Edit HTML.
Make sure the Expand Widget Templates check box on top right of the HTML window is unticked/unchecked.
Find the following lines in your HTML codes:
To copy code, click <> icon on the right
view sourceprint?
1 <b:section class='sidebar' id='sidebar1' preferred='yes'>
2 <b:widget id='HTML3' locked='false' title='' type='HTML'/>

This is your sidebar section, where widgets are located. The ids and other properties may not necessarily similar to the above. What’s important is the “<b:section class=’sidebar’…” tags must be there.
Now copy the codes below (all of them):
To copy code, click <> icon on the right
view sourceprint?
01 <b:widget id='Label88' locked='false' title='Labels' type='Label'>
02 <b:includable id='main'>
03 <!-- only display title if it's non-empty -->
04 <b:if cond='data:title != &quot;&quot;'>
05 <h2 class='title'><data:title/></h2>
06 </b:if>
07 <div class='widget-content'>
08 <div id='Labelcloud'>
09 </div>
10 </div>
11 <script language='javascript' type='text/javascript'>
12 function Magnifytxt() {
13 var max = 0;
14 var min = 10000;
15 <b:loop values='data:labels' var='label'>
16 if (<data:label.count/> &gt; max)
17 max = <data:label.count/>;
18 if (<data:label.count/> &lt; min)
19 min = <data:label.count/>;
20 </b:loop>
21 var display = &quot;&quot;;
22 <b:loop values='data:labels' var='label'>
23 var delta = <data:label.count/> - min;
24 var size = 80 + (delta * 100) / (max - min);
25 display = display + &quot;<span style='font-size:&quot; + size + &quot;%'><a expr:href='data:label.url + &quot;?max-results=100&quot;' style='text-decoration:none;'><data:label.name/></a></span> &quot;;
26 </b:loop>
27 obj = document.getElementById(&#39;Labelcloud&#39;);
28 obj.innerHTML = display;
29 }
30 Magnifytxt();
31 </script>
32 <b:include name='quickedit'/>
33 </b:includable>
34 </b:widget>

Insert (paste) the codes immediately below the line in step 5.
To copy code, click <> icon on the right
view sourceprint?
1 <b:section class='sidebar' id='sidebar1' preferred='yes'>
2 Insert the code here
3 <b:widget id='HTML3' locked='false' title='' type='HTML'/>

Click PREVIEW and look for your label cloud! If it’s there, then click SAVE TEMPLATE.
If you want to reposition or change the name of the label cloud go to Layout>Page Elements. Just drag it to reposition or type in the new name.
Done.


Give it a try, and feedback me afterwards okay.


Note: this label cloud code is based on the code by frivolousmotion.com.

10 tips for improving your Google search results


10 tips for improving your Google search results

There are times, even on Google, when you just can’t find what you are searching for. The search results just didn’t come out “right”, what you want just wasn’t there. How you wish you could do something extra…to get better search result.

Well today must be your lucky day, because I’m going to tell you that extra something, 10 tips for better Google searching. Hopefully these tips will give more relevance to the search results you get. The next time you Google search, instead of entering only your keywords in the search box, try the tips below.

Let’s start out by finding out the name of that fruit in the picture, try Google search spiky fruit.

Now that you know its name, let’s learn some more about strange-looking fruit using these tips:
Keyword definition. Define:[keyword] operator provides definitions for words, phrases, and acronyms from the Web. Let’s define:durian.

File type. [keyword] filetype:[filetype extension]. find documents of the specified type, as in durian filetype:pdf.

Image search. Google Image search, you can narrow down the images according to Size, Color and content type whether its News, Faces, Clip art, Line drawing or Photo. Now let’s do image search of durian.
 
Glossary. To look for glossaries, as well as dictionaries, lists of terms, terminology, etc use tilde(~) before keyword, as in ~durian.
 
Phrase. To look for exact phrases, put them in quotes as in “heavenly durian” or “durian stinks” .
 

Site page listing. Enough about durian. To show all webpages in a website or domain, use site:[domain] operator, as in site:www.tourismmalaysia.gov.my. You can use this method to check whether or not all of your pages are indexed by Google.
 
In-site search. To search inside a specific website, just add the keyword before site: operator, as in kelantan site:www.tourismmalaysia.gov.my.
 
Cached pages. To display Google's cached version of a web page use cache: operator, as in cache:http://www.bloggersentral.com/2009/04/keeping-your-widgets-when-changing.html. Especially useful if you want to recover deleted pages.
 
Link listing. To show webpages that link to a site use link: as in link:www.tourismmalaysia.gov.my.
 
Keyword exclusion. To exclude certain keyword from result pages use [keyword] –[excluded keyword], as in Barack –Obama.

You are welcomed to share your Google search tips here. Use the comments.

Adding a simple image caption


Adding a simple image caption 


Having trouble adding image captions to your photos? I know I do, especially if you are using Blogger post editor. I’ve switch to Windows Live Writer, yet still it doesn’t get any better in this department. (with WLW I can do it though, with the right plug-in of course).

Look at the picture, it does come with a caption. Okay, I’m going to show you how you can do just that, a simple image captioning. It will require some HTML coding, but no CSS is involved here. We will use a two-row HMTL table, first row for the image, and the second row for the caption.

Now let’s do this, the steps are as below:
 
1. Add an image the way you would normally do in Blogger post editor.
 
2. Switch to Edit HTML mode.
 
3. Find the code for your image, hint: it’s the <a onblur blah blah blah"><img blah blah blah;"/></a>.
 
4. Now you want to copy the table code below and paste it just below the image code line in step 3.

To copy code, click <> icon on the right


view sourceprint?

1 <table style="float: left; margin: 0px 10px 5px 0px; background-color: YOUR BACKGROUND COLOR HERE; font-style:italic"><tbody>
2 <tr><td>YOUR IMAGE CODE HERE</td></tr>
3 <tr><td align="c


5. After that you want to cut the original code (starting from <a… until </a>) and paste it to replace “YOUR IMAGE CODE HERE”.
 
6. Replace “YOUR BACKGROUND COLOR HERE” with a color code. 
 
7. You can change the photo alignment to the right by changing the float to float:right;. Also change the margin to your liking. 
 
8. That’s it. 

One note though, using this method you need to add the code to each individual photo.


Before you leave:
Do you find this article useful? Share it via Tweet This or Add This buttons below.
Any suggestion, question or comment? Please post it in the comments below.

Friday, September 17, 2010

How to backup Blogger template

How to backup Blogger template

Why do I need to backup my blog template? you may ask. Because sometimes unexpected things happen, i.e. you accidentally mess up your layout. If you have the backup layout stored in your PC, then reverting to the original is easy. Less headache for you.

You want to backup your template every time you want to tinker with the code. Better yet always keep a latest version of your template stored in your PC.

Now that you understand the importance of having a template backup, let’s start doing it:


Backing up a template
1. Log in to your Blogger account (if you haven’t logged in already).
2.Click the Expand Widget Templates checkbox.


3. Click the Expand Widget Templates checkbox.
4. Position your cursor inside the code window and right click and choose Select All.
5. Copy the code and paste it in Notepad or other text editor. For the sake of this tutorial, let’s name the file MyTemplateBackup.txt.
6. Keep the file in a safe place.
7. That’s it, you’ve backed up your blog template!
 

Restoring a template
Now whenever you want to restore your template, simply
1. Repeat step 1 to 3 above.
2. Open MyTemplateBackup.txt., Select All and copy.
3. Position cursor inside your template code window, right click and Select All.
4. Click Paste. The template code will be replaced by the code from MyTemplateBackup.txt.
5. … and your template is restored.

Enjoy!


Before you leave:
Do you find this article useful? Share it via Retweet, Share and Stumble buttons below.
Any suggestion, question or comment? Please post it in the comments below.
 

Adding a floating “back to top” button


Adding a floating “back to top” button

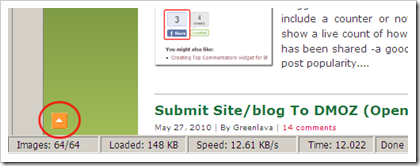
Back to Top button or link is a link that sends your viewer to the top of page once clicked. This will help your readers navigate better, especially so if you have long pages. This link is usually located at the bottom of page or in the footer area.

What I am going explain in this article is slightly different. The function is the same yet the location of the link/button is different. As the name suggests, we are making a floating (or is it static) button. The button will float at the bottom of your screen. It will stay there even if you scroll the page, and can be seen at all times. We will do this using only a short HTML code, with a little inline styling.

Note: This trick will not work in Internet Explorer. The button will appear nonetheless, but at the center bottom of your page, and doesn’t float.

Here are the steps:
1. Login to your Blogger account.
2. Go to Dashboard > Design > Edit HTML.
3. Back up your template.
4. Insert the following code immediately before the </body> tag in your HTML.

To copy code, click <> icon on the right

view sourceprint?

<a style="position: fixed; bottom:5px;left:5px;" href="#" 1title="Back to Top"><img style="border: none;" src="YourButtonUrl"/></a>


Replace YourButtonUrl with the link to your button or icon.

5. If you prefer to use text instead of an image, use this code:


To copy code, click <> icon on the right
view sourceprint?

<a style="position: fixed; bottom:5px;left:5px;" href="#" 1title="Click to go to top">YourTextHere</a>


Replace YourText with your own wording.

6. You can change the location of the button / link by changing the values of this code:

bottom:5px; left:5px;

To make the floating image work in IE, I suggest you read Stu Nicholls’ CSS Play. I tried out his method but to no avail. I’ll update this article whenever I find the solution.

Enjoy!
Click Older Posts To Next Pages